DuraLink DL-02
1. Overview
The DuraLink DL-02 reads fuel level from your vehicle's analog fuel sender and makes that data available to your GPS tracker over a standard 1-Wire connection. It appears to the tracker as three DS18B20 temperature sensors — one reporting liters, one reporting voltage, and one reporting fill percentage — with no additional hardware adapters required.
All configuration is done wirelessly through a built-in web interface accessible from any smartphone or laptop browser. No software installation or laptop cable is needed in the field.
2. Key Features
| Dual-Core Architecture | 1-Wire polling on Core 1 ensures continuous operation, while user tasks run on Core 0. |
| ADS1115 ADC | 16-bit precision provides highly accurate fuel level voltage readings. |
| Polynomial Calibration | Uses Teltonika-style cubic polynomial (voltage → liters) for exact fuel curve mapping. |
| 3 Live Sensor Values | Broadcasts fuel in liters, fill percentage, and raw voltage simultaneously via emulated DS18B20. |
| Signal Smoothing | Configurable presets (Responsive / Balanced / Stable) to eliminate fuel sloshing. |
| NVS Storage | Calibration, filter settings, and WiFi credentials persist across reboots and power cycles. |
| Wireless OTA Updates | Flash new firmware wirelessly via the web UI with built-in rollback protection. |
| Watchdog Timer | Built-in 10-second timeout automatically restarts the device if a task hangs. |
3. First-Time Setup
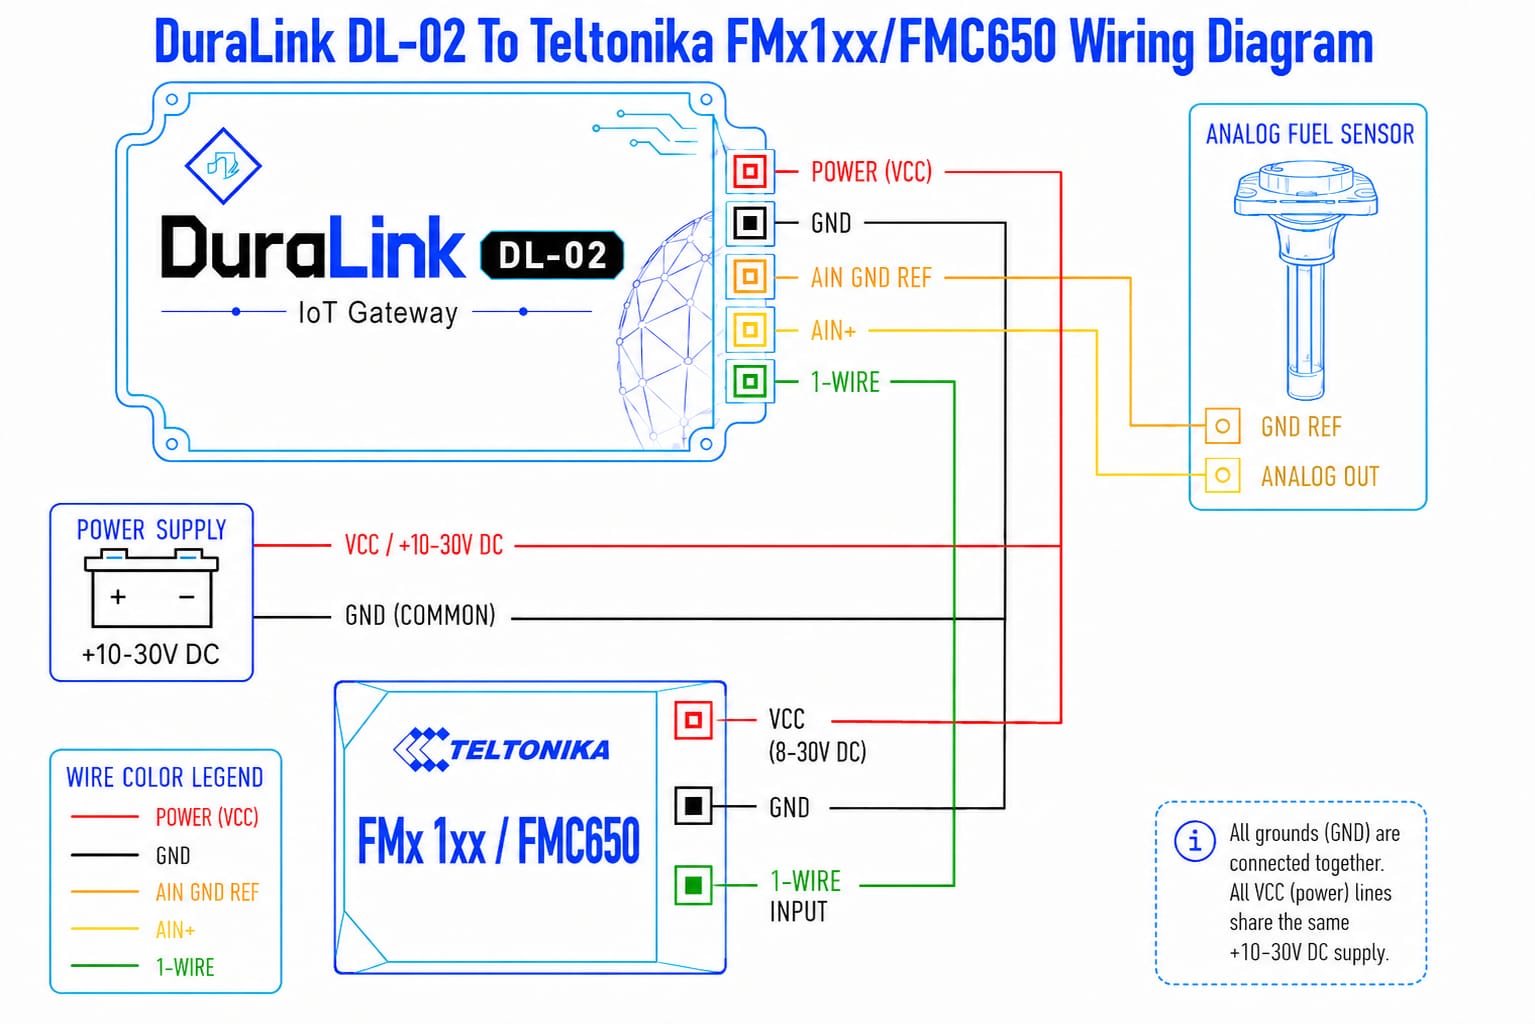
3.1 Wiring Diagram
3.2 Configuration Steps
1. Power on the device
Apply power. The DL-02 starts up and broadcasts its WiFi hotspot within a few seconds.
2. Connect to the DL-02 hotspot
On your phone or laptop, open WiFi settings and connect to:
| Network Name (SSID) | DL02-XXYY (last 2 characters of the device's MAC address — unique per unit) |
|---|---|
| Password | duraconfig |
3. Open the web interface
Open any browser and go to: http://192.168.4.1
4. Set your tank capacity
Go to the Settings tab → enter your tank capacity in liters → tap Save.
5. Calibrate the fuel sender
Go to the Calibration tab and follow the calibration procedure in Section 6. At least 2 measurements are required.
6. Configure your GPS tracker
Enter the sensor IDs from the Monitor tab into your Teltonika Configurator. See Section 5 for details.
http://192.168.4.1 as long as you are connected to the DL-02 hotspot.
You can adjust settings at any time without interrupting the tracker connection.
4. Web Interface
Open http://192.168.4.1 in your browser while connected to the DL02-XXYY hotspot.
The interface has four tabs at the bottom of the screen.
4.1 Monitor Tab
Shows live readings, updated automatically every 2 seconds:
| Display | What it shows |
|---|---|
| Liters | Calculated fuel level in liters based on your calibration. |
| Percent % | Fill level as a percentage of your configured tank capacity. |
| Raw Voltage | The voltage reading directly from the fuel sender (before smoothing). |
| Filtered Voltage | The smoothed voltage used for the fuel calculation. |
| 1-Wire Sensor IDs | The three sensor addresses in Teltonika format — ready to copy into your tracker configurator. |
4.2 Settings Tab
| Setting | Description |
|---|---|
| Tank Capacity (L) | The total capacity of your fuel tank in liters. This is used to calculate the fill percentage shown on the Monitor tab. |
| Smoothing Level | Controls how much the reading is stabilised against vibration and sloshing. See Section 7. |
4.3 Calibration Tab
| Control | Description |
|---|---|
| Calibration Points table | The list of liters/voltage pairs you have recorded. |
| + Add Point | Add a new row to the table. |
| ⊙ Capture button | Automatically records the current voltage reading — no manual measurement required. |
| ✕ Remove | Delete a row from the calibration table. |
| Clear All | Erase all calibration data. |
| Calculate Polynomial | Computes the fuel curve from your measurements and saves it to the device. |
| ↓ Export | Download a backup of your calibration data as a file. |
| ↑ Import | Restore calibration from a previously saved backup file. |
4.4 System Tab
| Section | Description |
|---|---|
| WiFi Access Point | View the device network name and change the hotspot password. The device restarts after saving. |
| Diagnostics | Device uptime, memory status, and 1-Wire bus activity — useful for support purposes. |
| Firmware Update (OTA) | Upload a firmware update file provided by your supplier. See Section 8. |
| Reboot Device | Restart the device remotely. |
5. Tracker Configuration
The DL-02 broadcasts three sensor values on the 1-Wire bus. You need to add these sensor IDs to your Teltonika Configurator so the tracker knows which data belongs to which channel.
The IDs are shown live on the Monitor tab of the web interface. Copy them directly from there and paste into your Teltonika Configurator (1-Wire → 1-Wire Data Source → Sensor ID field).
Example: value 45.3 = 45.3 liters
Example: value 23.5 = 2.35 V
Example: value 75.0 = 75% full
6. Calibration Guide
Calibration teaches the DL-02 how the voltage from your fuel sender corresponds to actual fuel levels in your tank. The more measurement points you provide, the more accurate the result. A minimum of 2 points is required; 4 or more is recommended.
Calibration Procedure
1. Start with a known fuel level
Begin with your tank at a known level — empty, or a specific number of liters you can measure accurately.
2. Open the Calibration tab
In the web interface at http://192.168.4.1, tap the Calibration tab.
3. Add a point
Tap + Add Point. Enter the current fuel level in liters in the Liters column. Then tap the ⊙ Capture button — this automatically records the current voltage for you.
4. Add fuel and repeat
Add fuel to a new known level. Wait a few seconds for the reading to settle, then repeat Step 3. Aim for at least 4 points — for example: empty, quarter, half, three-quarter, and full.
5. Calculate
Once all points are entered, tap Calculate Polynomial. The device computes the fuel curve and saves it automatically.
6. Verify
Check the Monitor tab to confirm the Liters reading matches your actual fuel level. Add more points and recalculate if needed.
7. Signal Smoothing
Road vibration and fuel sloshing can cause the fuel reading to fluctuate. The DL-02 includes powerful filtering algorithms to stabilise the reading. You can configure this in the Settings tab.
| Preset | Best For |
|---|---|
| Responsive | Calm roads, fast changes, low vibration environments |
| Balanced | Most vehicles and standard road conditions (Default) |
| Stable | Heavy vibration, off-road driving, or rough terrain |
8. Firmware Update
Firmware updates can be installed wirelessly from the web interface — no cable or site visit required. Your supplier will provide the update file when a new version is available.
1. Obtain the update file
Contact your supplier to receive the firmware update file (.bin format).
2. Connect to the DL-02 hotspot
Connect to DL02-XXYY and open http://192.168.4.1 in your browser.
3. Go to the System tab
Tap the System tab at the bottom of the screen.
4. Select the update file
Under Firmware Update, tap Choose File and select the .bin file provided by your supplier.
5. Upload and install
Tap ↑ Upload & Flash. A progress bar shows the status. Do not close the browser or remove power during this step.
6. Wait for reboot
The device reboots automatically after the upload completes. The page reloads on its own.
9. Factory Reset
If you have forgotten the hotspot password, or if the device needs to be returned to its original default settings, you can perform a factory reset using the BOOT button on the device.
Reset Procedure
1. Ensure the device is powered on and running normally
Do not hold the button while connecting power.
2. Press and hold the BOOT button for 3 seconds
The button is labelled BOOT on the device.
3. Wait for the device to reboot
The device erases all settings and restarts automatically.
4. Reconnect with the default credentials
Use the factory-default hotspot password to reconnect and reconfigure.
Default Settings After Reset
| Setting | Default Value |
|---|---|
| Hotspot Name (SSID) | DL02-XXYY (unique to the device) |
| Hotspot Password | duraconfig |
| Web Interface URL | http://192.168.4.1 |
| Tank Capacity | 100 L |
| Smoothing Level | Balanced |
| Calibration | Cleared — recalibration required |
10. Troubleshooting
| Problem | What to Check |
|---|---|
| Tracker shows no fuel sensor data | Confirm the sensor IDs from the Monitor tab are entered correctly in the Teltonika Configurator. Check that the 1-Wire cable is connected properly. |
| Fuel reading shows 0 or is clearly wrong | The device may not be calibrated yet. Open the Calibration tab and follow the calibration procedure in Section 6. |
| Fuel reading jumps around | Increase the smoothing level in the Settings tab. Try Balanced or Stable. |
| Cannot connect to the web interface | Make sure your phone is connected to the DL02-XXYY WiFi network — not your home or office network. Then open http://192.168.4.1. |
| Forgot the hotspot password | Perform a factory reset (see Section 9). The default password duraconfig will be restored. |
| Firmware update fails or shows an error | Stay close to the device during the update. Ensure the .bin file was provided by your supplier and has not been renamed or modified. |
| Reading is inaccurate after calibration | Add more calibration points across the full tank range (empty, quarter, half, three-quarter, full) and recalculate. Always calibrate on level ground. |
| Device appears unresponsive | Use the Reboot Device button in the System tab, or remove and restore power to the device. |
11. Specifications
| Model | DuraLink DL-02 |
| Firmware Version | v1.3.0 |
| Input Voltage | 9V - 26V |
| Compatible Trackers | Any Teltonika Telematics devices with a 1-wire interface |
| Sensor Outputs | 3 × DS18B20 1-Wire — Fuel Level (L), Voltage Reference, Fill Percent (%) |
| Measurement Range | 0–125 liters (Sensor 1) · 0–100% fill (Sensor 3) |
| Calibration | Up to 10 points, cubic polynomial curve-fit. Export/import supported. |
| Signal Smoothing | 3 presets — Responsive, Balanced (default), Stable |
| Wireless | WiFi 802.11 b/g/n, 2.4 GHz |
| Web Interface URL | http://192.168.4.1 |
| Default Hotspot Name | DL02-XXYY (unique per device — last 2 bytes of MAC address) |
| Default Hotspot Password | duraconfig |
| Settings Storage | NVS (Retained across power cycles and firmware updates) |
| Factory Reset | BOOT button — hold 3 seconds while device is powered on |
| Firmware Updates | Wireless (OTA) via browser with rollback protection |
12. Firmware Changelog
v1.3.0
- New: Wireless OTA (Over-The-Air) firmware update via the web interface.
- Fix: Resolved an issue where 1-Wire data could pause while a user was configuring the device via WiFi.
- New: Added diagnostic tools to the System tab for troubleshooting 1-Wire connections.
v1.2.0
- Product Renamed: Now officially DuraLink DL-02.
- Security: Hotspot name is now unique per device (e.g.
DL02-XXYY). - New: Filter mode added with presets (Responsive, Balanced, Stable).
- UI Redesign: Completely new dark-themed, mobile-friendly interface with tabbed navigation.
v1.1.0
- New: Added a 3rd sensor channel to broadcast fuel fill percentage (0–100%).
- New: Added selectable filtering algorithms for heavy sloshing environments.
v1.0.0
- Initial release featuring liters and raw voltage outputs.